Bedroom Lego Display Shelves
This post may contain affiliate links. I may receive a small commission for purchases made through these links at no cost to you. Get more detail in my Disclosure Policy.
We're 4 week into the One Room Challenge and our tween boy room is really taking shape! This week, we're finishing the Accent Wall with some Lego Display Shelves, addressing clothing storage & giving him a bedside surface. Well, almost finishing. The final touches will be at the end. But I digress.

If you missed the room reveal, the plan, and all of the before photos, check out the posts for Week 1, Week 2 & Week 3.
The Accent Wall

For the navy accent wall, we're going to solve one of the biggest problems my son had with his room: Lego Set Display. Some kids like to freestyle build with Legos. Build them up and tear them down. Not my kid. He likes to build according to the instructions, and then look at his masterpiece for months on end. So we needed to come up with a way to maximize the Lego Display area.

I found these cool, Industrial, Iron Shelf Brackets on Amazon. These are a J style bracket, which is perfect because his name starts with J. They're personalized, right? That's what we're going with.
Anyway, we decided to use plain old 1x10s in the brackets to make the shelves for our Lego Display. Since we wanted to maximize the available display space, we decided to span the wall at the very top with a 12′ 4.5″ shelf (made of 2 1x10x8 boards cut to size). We also wanted two 6′ shelves underneath.
The Finish

Like the Lego Stations from last week, we used the custom mix of stains that we created for that project. This way, they all match. We spent 2 days in the garage finishing these Lego display shelf boards. The first chore was to sand the boards using our Random Orbital Sander with 80 grit & 220 grit sandpaper, making sure to ease the edges. Then we finished with one coat of our custom stain & 3 coats of Polycrylic Matte.
The Installation
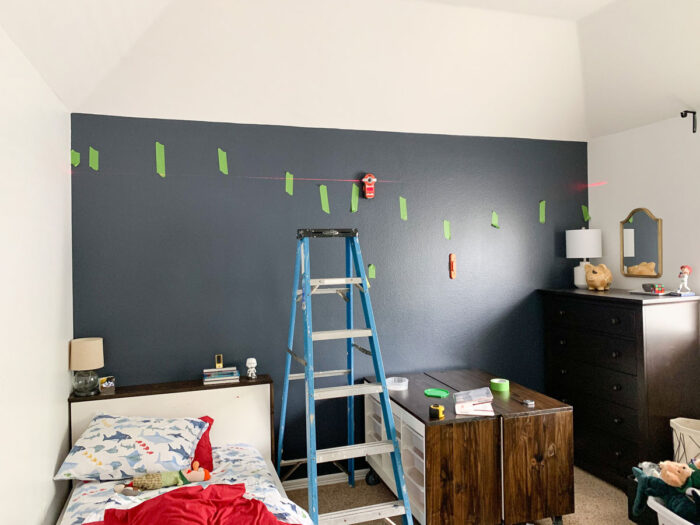
The studs in this wall are not equidistant. Since we were spanning the wall with the top shelf, we really needed an even pattern with our brackets. The shelf brackets can hold 70 pounds IF they are installed into studs. That wasn't going to happen with this wall, so I picked up these drywall anchors that can hold 100 pounds. We used these to install our Frame TV in the Living Room.

I love these anchors, because you don't need to pre-drill. You just use your Phillips Head drill bit to screw them directly into the wall. The supplied black screws for the shelf brackets fit perfectly in the toggle bolts. We ended up with spacing about 26″ apart. We used our laser level stud finder to make sure everything was in the right spot.
It took us about 45 minutes to install all 12 brackets and secure the Lego Display shelves with the provided 1/2″ screws.
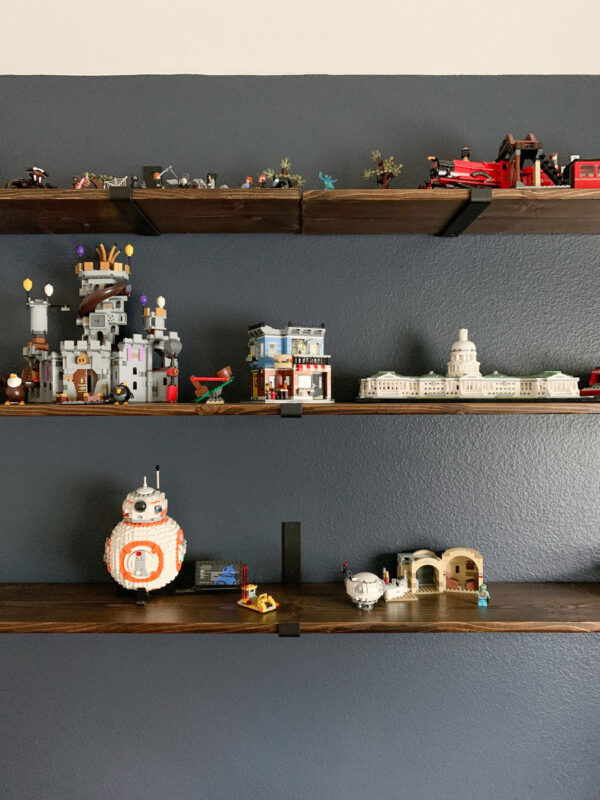
Lego Display
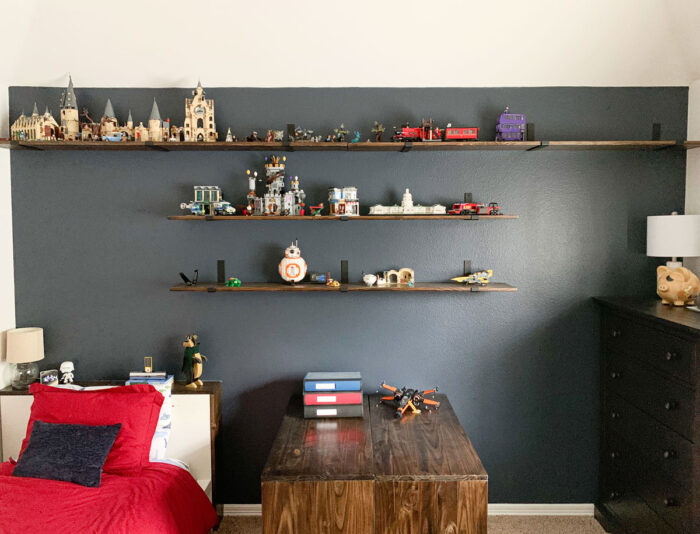
He's currently on a Harry Potter collection kick, so he was very particular in the order he displayed his sets. His birthday & Christmas are coming up, and he has some new HP sets on his list, so he left a little space for those on the right.
The next Lego Display shelf is a mix of different sets, and then the bottom shelf has Star Wars sets.
The Bedside Surface
In his old room, he had a small side table that he used for a nightstand. It was great for a little kid, but he needed more space. He now has an alarm clock, he wanted a place to put his book, and he wanted a reading light. He just needed more space. I didn't really want to buy a piece of furniture, and with the Lego Station, nothing would really fit next to his bed. So we decided to go up.
When we repositioned his bed, we decided to leave the headboard about 6″ from the wall. We wanted to use that space to build a little shelf so that he could have a surface the width of his bed in order to take care of his needs.

The first thing I did was to install a new outlet to power his lamp, ipod dock, and alarm clock. This wall has accessible attic on the other side, so that was easy. Next, we installed 3 scrap 2×4 pieces into studs in the wall with some 3″ cabinet screws, making sure the tops were all level and exactly the height of the top of his headboard.

We used a 1×8 & cut it into two pieces – one the width of the headboard, and the other the height of the headboard. After sanding & finishing the same as the shelves, I used my nail gun to attach the board to the 2x4s in the studs. The front of the board sits on top of the bed. We cut out space for the baseboard and simply wedged the side piece in place. That way, we can access the outlet if we need to.
This little bedside solution has been absolutely perfect! It solves all of his major issues, gives him a place to put a glass of water, and gives him some display space near his bed. He loves it, and I love that it was under $20!
The Dresser

This week, we also moved the new dresser into his room. Last month, we found this amazing dresser at HomeGoods that checked all of our boxes. It was red tagged for $210 because it had a giant hole in the back. Who sees the back of a dresser? So I asked the manager what their best price was, and he sold it to me for $200. When I got home, I looked it up online, and the retail price for this dresser was $600! WOW!
We picked up a new white lamp from HomeGoods as well as a flat white plate to use as a tray to corral his stuff. I've long been obsessed with this mirror, and I felt like this was the perfect space for it. It's not too feminine, and also brings in a little of that Harry Potter look with the distressed gold finish. He loves it!
The Budget

As with last week, wood is super expensive right now. Also, 14 iron shelf brackets aren't cheap, but I feel like ordering them from Amazon was the cheapest option for the look I was going for.
12 Shelf Brackets – About $80
Shelf Boards $62
Bedside Board $13
Drywall Anchors $20
Polycrylic (we had the stain on hand) $18
Dresser $200
Decor (Lamp/Mirror/Dish/Frame) $72
Total: $465
That's not bad for all that we got accomplished. We have so much storage now for lots of sets on his Lego Display! He really loves how they look and can't wait to show his friends! These shelves were easy and quick to complete from start to finish.
![]()
There's only 2 weeks left and I have so much to show you! Make sure you're following along on Instagram. I'm posting Stories there so you can get a sneak peek!
Make sure you stop by the One Room Challenge Blog and check out the latest from all of the other spaces in the challenge. There's so much inspiration!
That was a lot of painting. I'm so glad its done. What do you think so far? Are you a fan of the color or no? How many sets do you think the Lego Display will hold? Let me know in the comments!
Source: https://www.stacyssavings.com/one-room-challenge-fall-2020-tween-boy-bedroom-week-four-lego-display-more/
